TERMINAL LEARNING OBJECTIVE
1. Given
a casualty in a combat environment and standard field medical equipment
and supplies, perform procedures for intravenous (IV) therapy to prevent
further injury or death. (FMST-HSS-1416)
2. Given a casualty in a combat environment and standard
field medical equipment and supplies, to include the FAST1, perform the
procedures for the insertion of the FAST1 Intraosseous Device to
administer fluids and medications, to prevent further injury or death.
ENABLING LEARNING OBJECTIVES:
1. Without
the aid of references, given a description or list, identify medical
terminology associated with IV therapy, per the student handout.
(FMST-HSS-1416a)
2. Without
the aid of references, given a description or list, identify
characteristics of different types of IV fluids, per the student handout.
(FMST-HSS-1416b)
3. Without
the aid of references, given a description or list, identify the
indications for initiating IV therapy, per student handout.
(FMST-HSS-1416c)
4. Without
the aid of references, given a description or list, identify the use for
specific IV fluids, per the student handout. (FMST-HSS-1416d)
5. Without
the aid of references, given a description or list, identify the equipment
required for IV therapy, per the student handout. (FMST-HSS-1416e)
6. Without
the aid of references, given a description or list, identify the
procedural sequence for IV therapy, per the student handout.
(FMST-HSS-1416f)
7. Without
the aid of references, given a description or list, identify potential
complications of IV therapy, per the student handout (FMST-HSS-1416g)
8. Without
the aid of references, given a simulated casualty and standard field
medical equipment and supplies, perform procedures for IV therapy, per the
student handout. (FMST-HSS-1416h)
9. Without the aid of references and given a
description or list, identify the indications for initiating the
FAST1 Intraosseous Device, per the FAST1 User’s Manual and the PHTLS
Manual, 6th Edition.
10. Without the aid of references and given standard field
medical equipment and supplies to include the FAST1, identify the
components required to initiate the Intraosseous Device, per the FAST1
User’s Manual and the PHTLS Manual, 6th Edition.
11. Without the aid of references and given a description
or list, identify the procedural sequence for initiating the FAST1
Intraosseous Device, per the s FAST1 User’s Manual and the PHTLS Manual, 6th
Edition.
12. Without the aid of references and given a description
or list, identify the potential complications and treatments of
complications when initiating the FAST1 Intraosseous Device, per the FAST1
User’s Manual.
13. Without the aid of references and given a simulated
casualty and standard Field Medical Service Technician equipment and
supplies, perform procedures for initiating the FAST1 Intraosseous Device,
per the FAST1 User’s Manual and the PHTLS Manual, 6th Edition.
14.
Without the aid of references and given a simulated
casualty and standard Field Medical Service Technician equipment and
supplies, perform procedures for removing the FAST1 Intraosseous Device,
per the FAST1 User’s Manual.
1. Introduction
In civilian trauma situations, it is standard for the
prehospital care provider to place two large bore intravenous (IV)
catheters and start fluid resuscitation with 2 liters of crystalloid
fluid. However, as stated in the lesson on Shock, no research has
demonstrated improved survival of critically injured trauma casualties
when IV fluid therapy has been administered in the field prior to the
casualties’ arrival in a treatment facility. In fact, multiple studies
using uncontrolled hemorrhagic shock have found that aggressive fluid
resuscitation before surgical repair of a vascular injury is associated
with either no improvement in survival or increased mortality when
compared to no resuscitation or minimal resuscitation.
In this
lesson, we will discuss the principles of fluid resuscitation in a
tactical situation and the decision making process of when to give fluids
by mouth, through an IV, or through the intraosseous (IO) route. Since
the IO is a relatively new concept for most people, we will discuss this
topic in depth. Finally, we will discuss what types of fluids and how
much fluid to give to a casualty on the battlefield.
2.
TERMINOLOGY
- the following terms and their definitions are essential
to understand IV fluids and the basics of electrolyte imbalances.
Homeostasis - a state of
physiological equilibrium produced by a balance of functions and chemical
composition within the body. Homeostasis is usually maintained as long as
the fluid volume and chemical composition of the fluid compartments stay
within narrow limits or within a state of equilibrium.
Electrolyte - an element or
compound that, when melted or dissolved in water or another solvent,
disassociates into ions and is able to carry an electric current. Fluids
containing these electrolytes and water are called crystalloids.
Crystalloids - IV fluid,
consisting mostly of sodium chloride and other electrolytes, that serves
as a volume expander. This solution does not have oxygen carrying or
blood clotting capabilities. The two most common types are Normal Saline
(NS) and Lactated Ringers (LR).
Colloids - large molecules,
such as proteins. When in an IV solution, the solution is called a
colloid solution or volume expander. Blood plasma, serum albumin, and
plasma substitutes (Hextend) are the most common solutions. These
solutions are all hypertonic in nature.
Body Fluid Compartments -
spaces into which body fluids are distributed. Movement of water and
electrolytes between these compartments are regulated by various body
systems, so that distributions of substances within the body remain within
fairly narrow limits. This helps maintain homeostasis.
Isotonic - a solution that
triggers the least amount of water movement from the vascular system into
or out of the cells or surrounding tissue (i.e., NS or LR).
Hypotonic - a solution that
causes water to leave the vascular system and enter the cells or
surrounding tissue compartments (i.e., D5W or solutions containing only
water and dextrose).
Hypertonic - a solution that
draws water from the surrounding cells and tissue compartments back into
the vascular system. Out of the three types of fluids listed, hypertonic
saline (HTS) shows the most promise for use in trauma and tactical
situations.
3. INDICATIONS/CONTRAINDICATIONS
FOR PO FLUIDS
|
Figure 1.
Casualty with abdominal wound
drinking water |
Trauma surgeons attached to
forward-deployed Medical Treatment Facilities (MTFs) have noted that
many casualties are kept on nothing by mouth (NPO) status for prolonged
periods in anticipation for eventual surgery. Patients in a combat
environment often operate in a state of mild dehydration. Once injured,
they can easily develop greater levels of dehydration. The combination
of dehydration and hemorrhage greatly increases the risk of mortality.
There is very little evidence of emesis during surgery of patients that
received oral hydration following injury. Therefore, oral fluids are
recommended for all casualties with a normal level of consciousness and
the ability to swallow, including those with penetrating torso trauma
(see figure 1). If the casualty does not have a normal level of
consciousness then the care provider may start fluid resuscitation by
the IV or IO method.
Indications
Injured casualty with normal level of consciousness and
ability to swallow
Contraindications
Decreased level of consciousness
4.
INDICATIONS/CONTRAINDICATIONS FOR IV THERAPY
Indications
-
Uncontrolled hemorrhage
- Diarrhea
or vomiting
- Burns
- Unable to
tolerate fluids by mouth (to maintain hydration and/or nutrition
when the
patient is NPO)
- To give IV medications
Contraindications
-
Absence of signs and symptoms of the above indications
5. TYPES
OF INTRAVENOUS SOLUTIONS
IV solutions
fall into four basic groups:
- Crystalloids
(water and electrolytes)
- D5W (water
and glucose)
- Colloids
(water and protein or protein substitutes)
- Whole blood or blood products
Crystalloids - solutions that
are isotonic are effective for volume replacement for a short period of
time. These solutions do not have any oxygen carrying capacity and
contain no proteins. One hour after administration of a cyrstalloid
solution, only one-third remains in the vascular system, the rest shifts
into the surrounding tissue causing edema. The two most common
crystalloids used are NS and LR solution, these fluids are commonly used
in the treatment of shock.
Indications
- NS and
LR can be safely used in most situations.
- Acceptable alternate to Hextend if not available.
Contraindications/Precautions
- The risk of
fluid volume overload must always be considered.
- Excessive infusion of electrolytes may cause electrolyte
imbalances.
Water and Glucose Solutions - dextrose and water
solutions come in different concentrations of dextrose. The most common
concentrations are D5W and D50W. These solutions are considered hypotonic
solutions.
Indications
D5W - for fluid replacement and
caloric supplementation in patients who cannot maintain adequate oral
intake. D5W is NOT the first fluid of choice to treat dehydration in the
field.
D50W - for adults with
hypoglycemic (low blood sugar) emergencies. Usually given as a 50ml
bolus. D50W is NOT indicated for trauma patients in combat situations.
Contraindications and Precautions
- Do not use in head injuries or massive tissue injuries.
Dextrose solutions become hypotonic in the body and will cause cellular
swelling.
Colloids and Plasma Substitutes
- blood plasma, serum albumin, and plasma substitutes are the most common
solutions. These solutions are all hypertonic in nature. The plasma
substitute Hextend is the IV fluid of choice for volume replacement due to
trauma in a tactical situation. It stays in the vascular system longer
than crystalloid solutions.
Indications
- To increase the B/P more rapidly than other solutions.
Contraindications/Precautions
- Some complications are associated with increased bleeding
time (due to lack of clotting factors in solution) and anaphylactic
reactions.
- Do not use more than 1,000 cc’s.
Whole Blood - only available
in combat in rear areas (echelon two is the first place blood is
available, i.e., Medical Battalion). Must be ordered by a Medical
Officer. In combat, type O-negative (universal donor) is supplied and
can be given without prior cross-typing.
Indications
- Used to treat acute, massive blood loss requiring the
oxygen carrying properties of red blood cells along with the volume
expansion provided by plasma.
6.
EQUIPMENT REQUIRED FOR IV THERAPY
-
Needle/catheter (18 gauge)
- IV Solution
-
Administration set
- Tape
-
Constriction band
- Alcohol or
betadine prep pads
- 2x2’s,
bandaid and/or tegaderm
- IV pole
7.
PROCEDURAL
STEPS FOR INITIATING AN IV
You
have all started IV’s in the past. Below is a review of what steps to
take when inserting an IV. You will all have a chance to start an IV in
the performance application stage of the lesson.
- Make
decision
-
Assemble and check gear
-
Prepare the administration set
-
Prepare patient
- Select
a vein
- Insert
IV
-
Connect the tubing
- Secure
the IV and start administering fluid
8.
POTENTIAL
COMPLICATIONS OF IV THERAPY
No medical treatment is without risk. As a care provider,
your first priority is to do no harm. With that said, there are times
when your best treatment will result in outcomes that were not desired.
Listed below are the most common complications of IV therapy and their
treatment.
|
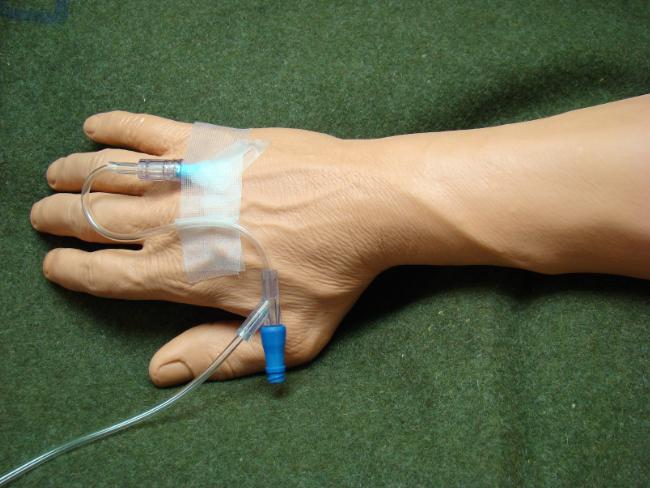
Normal IV Site
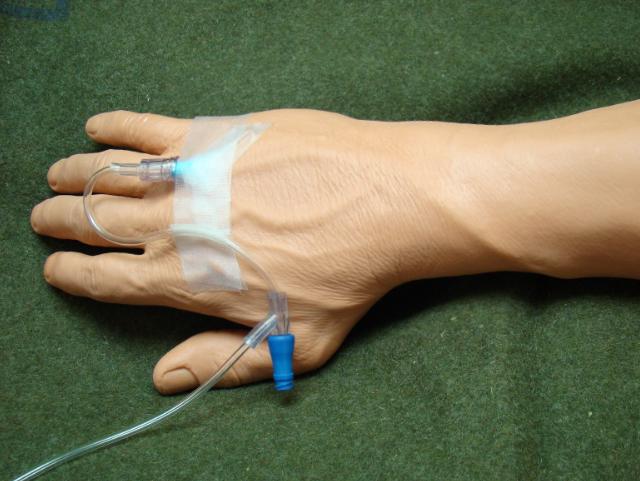
IV is Infiltrated

Phlebitis
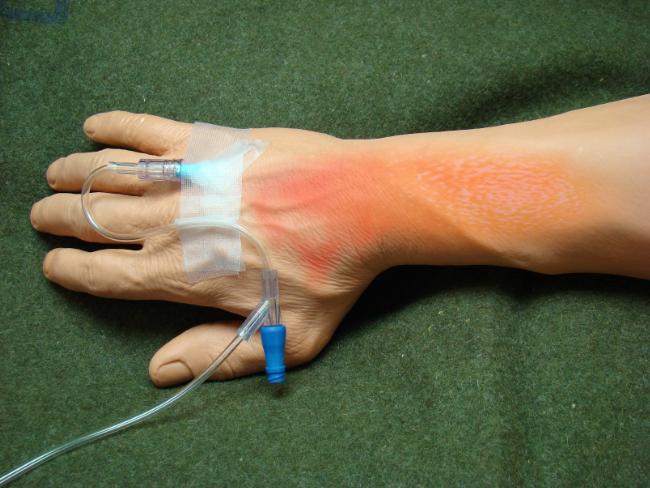
Infection with cellulitis
Substitute Figures 2, 3, and 4* |
Infiltration (local) - escape of fluid from the vein
into the tissue when the needle/catheter dislodges from the vein (see
figure 2).
Symptoms
- Edem
- Localized pain or discomfort
- Coolness to touch at the site of cannulation
- Blanching of the site
- IV flow stops or slows
Treatment
- Discontinue IV
- Select an alternate site
-
Apply heat to the affected area
- Elevate the limb
Prevention
- Secure
the catheter properly
- Limit movement of the limb
Phlebitis (local) -
inflammation
of a vein due to bacterial, chemical, or mechanical irritation (see figure
3).
Symptoms
- Pain along the course of the vein
- Redness appears as a streak above vein and
above the IV site
- Warm to touch
- Vein feels hard or cordlike
Treatment
-
Discontinue IV
-
Warm pack to the area
- Antibiotics
Prevention
- Ensure aseptic technique when starting IV
- Place date/time when catheter was inserted on the tape
- Rotate infusion sites based on local policies (usually
every 72 hours)
Nerve Damage (local) -
usually
results when the arm is secured too tightly to the arm board, compressing
nerves.
Symptoms
- Numbness
of fingers and hand
Treatment
-
Reposition and loosen arm board
Prevention
- Ensure tape is not applied too tightly
Circulatory Overload (systemic) - an effect of
increased fluid volume which can lead to heart failure and pulmonary edema
as a result of infusing too much IV fluid or too rapidly.
Symptoms
- Headache
- Venous
distention
- Dyspnea
- Increased
blood pressure
- Cyanosis
- Anxiety
- Pulmonary
edema
Treatment
- Slow down the flow rate
- Place patient in high
Fowlers position (sitting position)
Prevention
- Monitor
and control flow rate
Air Embolism - air circulating in the blood when
it gets introduced through IV tubing.
Symptoms
- Cyanosis
-
Hypotension
- Weak and
rapid pulse
-
Shortness of breath
-
Tachypnea
Treatment
- Position patient on left side in reverse
Trendelenburg, so that air in the right ventricle floats away from the
pulmonary air flow tract.
- Administer oxygen
- Notify Medical Officer
- Monitor vital signs
Prevention
- Flush IV line thoroughly to remove air prior to
insertion
- Monitor tubing during therapy
- Avoid introducing air through any syringe or extension
tubing
Systemic Infection - due to poor aseptic technique
or contamination of equipment (see figure 4).
Symptoms
- Sudden rise in temperature and pulse
- Chills and shaking
- Blood pressure changes
Treatment
- Look for other sources of infection
- DC IV and restart in other limb
- Notify MO and anticipate antibiotic treatment
Prevention
- Ensure aseptic technique when starting IV
- Place date/time when catheter was inserted on the tape
- Rotate infusion sites based on local policies (usually
every 72 hours)
9. I/o
Infusion
OVERVIEW
Fluid
resuscitation for hemorrhagic shock is a clear indication for IV access in
a tactical situation, but the peripheral vasoconstriction that accompanies
shock makes IV access difficult. Previously used measures to obtain IV
access, such as venous cutdown procedures, are time-consuming and not well
suited for the battlefield. Also, the
average time to initiate IV access has been found to be between 3 and 12
minutes and the failure rate is between 10 and 40 percent. Additionally,
battlefield casualties may have a traumatic amputation precluding IV
access in an extremity. An IO device offers an alternative route for the
administration of fluids in these types of casualties. This device is not
meant to replace IV infusion; it is to be used when IV access cannot be
obtained. IO
infusion devices provide a quick (can be placed in 60 seconds), reliable
intravascular access when peripheral IVs cannot be started.
IO infusion is the medical
process of getting fluids, emergency drugs, and even blood into a
patient’s circulatory system by delivering them into the marrow space
inside a bone. The IO space is a specialized area of the vascular system
where blood flow is rapid and continues even during shock. Drugs and
fluids infused via the IO route reach the central circulation as quickly
as those administered through standard IV access.
10.
ANATOMY
The sternum consists of the
manubrium, the body, and the xiphoid process (see figure 6). At the top
of the manubrium is the jugular notch, which is used as a reference
point for intraosseous placement.
The sternum makes an ideal IO site for several reasons:
- It is very
easy to locate and readily accessible
- It is
protected from trauma by flak vest
- It is
thinner and easier to penetrate than other bones.
- Most importantly, fluids infused into the sternum reach
the circulatory system more rapidly.
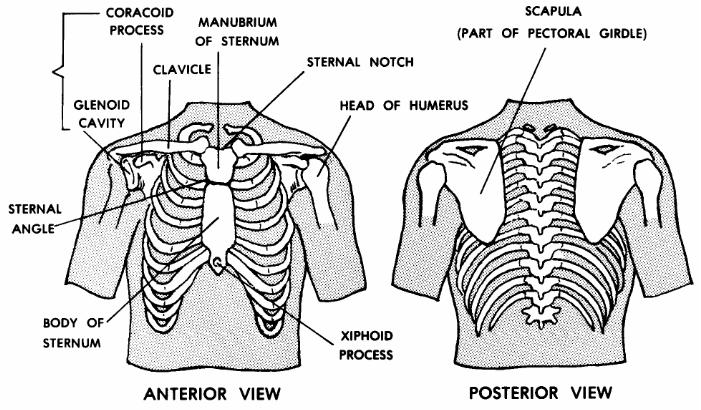
Substitute Figure 6: Sternum anatomy* |
11.
THE FAST1™ (FIRST ACCESS
FOR SHOCK AND TRAUMA)
There
are several different manufactures of IO devices. After a review of
available commercial devices, the Committee on Tactical Combat Casualty
Care concluded that the FAST1
is the IO device best suited for trauma care on the
battlefield. Features such as speedy access, a protected infusion site,
and a depth-control mechanism make the
FAST1 ideal for emergency
use.
12.
COMPONENTS OF THE FAST1
Target/Strain-Relief Patch
The Target/Strain-Relief Patch is a
foam patch with an adhesive back. The key features of the patch are the
locating notch, a hole indicating the target zone, a band of velcro
fastening, and a connector tube with a female luer on each end. The
patch is placed on the patient with the locating notch matching the
patient’s jugular notch and the target zone over the patient’s midline.
The adhesive backing prevents the patch from becoming displaced. The
target zone, a circular hole, indicates the location of the designated
insertion site.
Introducer
The introducer is a hand-held tool. The bone probe
cluster, stylet, infusion tube, and depth control mechanism are mounted
inside the introducer handle. The bone probe needles are covered by a
plastic sharps cap that is removed before use. The introducer allows the
operator to push the flexible infusion tube through the skin, tissue, and
anterior cortical bone of the manubrium. The force required to penetrate
the bone is provided entirely by the operator, it is not spring loaded or
battery operated. The depth control mechanism automatically separates the
infusion tube from the Introducer body at a pre-set depth, preventing the
operator from over or under penetrating the patient’s bone.
Infusion Tube
The Infusion Tube is the primary component of
the FAST1 System. It consists of a steel portal (the sharp tip which
penetrates the bone), a length of flexible infusion tubing, and luer
connector. When the tube is inserted by the Introducer, the steel portal
penetrates the anterior cortical bone of the manubrium. After insertion,
the fluid delivery port is within the marrow space of the bone. The
entire steel portal is subcutaneous. The tubing delivers drugs or fluids
into the manubrial marrow space. The flexibility of the tubing allows it
to move with the patient’s skin. The Infusion Tube is connected to the
fluid source via the connector tube on the patch.
Protector Dome
The
Protector Dome is a clear plastic cover with velcro fastening, which mates
with the ring on the Target/Relief Patch. After drugs or fluids have
begun to flow into the patient, the Dome is placed over the patch. The
velcro secures the dome in position over the site. This is the final step
in placing the FAST1 system. The dome covers and protects the infusion
site.
Sharps Protection
Before use, the bone probe cluster and
stylet are covered by a clear plastic Sharps Cap. After use, the
retracted bone probe needles and stylet tip are pushed into the
foam-filled Sharps Plug. This reduces the risk of accidental needle
stick injury. For additional protection, the pre-use cap should be
placed over the post-use plug once the needles have been fully inserted
into the plug.
Remover
This component of the system
enables the Infusion Tube to be removed when the decision to discontinue
intraosseous infusion is made. The Remover slides inside the Infusion
Tube and threads into the inside of the metal portal tip. By pulling
straight back on the Remover, the portal and Infusion Tube are removed
from the patient.
13. SEQUENCE FOR INITIATING THE
FAST1
a. Cleanse insertion site using aseptic
technique.
b. Align finger with jugular notch and place
patch, verifying patch is midline.
c. Place Introducer in target on patch. Hold
with a firm grasp.
d. Insert Introducer perpendicular to the manubrium.
Use continuous increasing pressure to insert.
e. Remove Introducer. Pull straight
back.
f. Connect Infusion Tube to Target Patch
Tube.
g. Cap introducer using post-use cap
supplied.
h. Connect to I.V. tubing.
i. Place Dome once all items are
connected.
j. Attach Remover package to patient for
transport.
14.
POINTS TO REMEMBER WHEN INSERTING THE FAST1
a.
Don’t
pull back and re-push.
b.
Don’t
use extreme force.
c.
Insert
Introducer perpendicular to sternum.
d.
Attach
Remover package for transport.
15.
POTENTIAL COMPLICATIONS AND TREATMENT
a. The sternal notch cannot be located.
Probable Cause: Extreme obesity
or abnormal sternal anatomy.
Recommended Action: Abort the
procedure. Proper targeting requires accurate location of the patient’s
sternal notch. Employ an alternative method of vascular access.
b. The patch has been incorrectly placed.
Probable Cause: Operator error
during application, movement of the skin over the manubrium during
application, or patient movement after placement.
Recommended Action: Return the
patient to his/her original position. If the patch is still incorrectly
positioned, remove it and reposition. During placement, ensure that the
skin over the sternum is not stretched away from its normal position.
c. The patch will not adhere to the skin.
Probable cause: Wet skin or thick
body hair.
Recommended Action: Shave or dry
skin and clean using aseptic technique. The patch can also be taped down
using the extended tabs. If the Patch becomes detached during use, it
should be taped to the skin.
d. The Bone Probe Cluster is fully pushed in,
but the Introducer does not release.
Probable Cause: Excessively thick
tissue, extreme misplacement, or irregular anatomy.
Recommended Action:
a) Pull Introducer back; the
Infusion Tube may be in place, although the Introducer could
not release due to tissue
thickness. Verify by withdrawing marrow, and proceed.
b) Re-attempt with a new FAST1.
If second attempt fails, seek alternative method
of vascular access.
e. Introducer does not release with high
applied force.
Probable Cause: Extreme bone
hardness or technique error.
Recommended Action: Without
pulling back on the Introducer, check that the Introducer is perpendicular
to the manubrium surface and that force is being applied directly along
the Introducer axis. Some patients may have a very hard bone; if control
of the Introducer cannot be maintained, find alternate method of vascular
access.
f. The Introducer releases but the Infusion
Tube falls out of the patient.
Probable Cause: The Infusion Tube
did not adequately penetrate the anterior cortical
bone of the manubrium due to
excessive tissue thickness or very hard bone.
Recommended Action: Re-attempt
with a new FAST1 device.
g. Low or no flow through Infusion Tube.
Probable Cause: There is a severe
kink in the tubing, there is a line blockage, or the
portal failed to penetrate the
manubrium.
Recommended Action: Check for
kinked tubing. If no kink can be found, attempt to clear the line by
pushing in 10 cc’s of fluid. If this fails to improve the flow rate, use
an alternative method of vascular access.
h. Leakage at the insertion site.
Probable Cause: Fluids are
leaking from inside the manubrium past the tip of the Infusion Tube.
Recommended Action: A small
amount of leakage sometimes occurs and is commonly
acceptable in IO infusion. The
operator must judge whether the patient is receiving an adequate amount of
drugs or fluids. If leakage is excessive, an alternative method of
vascular access should be used.
16.
REMOVAL OF THE
FAST1
In a tactical situation, you
will be concerned with obtaining IO access in order to give fluids or
medications. It is unlikely that you will need to remove the device.
However, if you should find yourself in a situation where the device is
not working properly, use the steps listed below to remove it.
a. Stabilize target patch with one hand
and remove Dome with the other hand.
b. Terminate IV fluid flow and disconnect Infusion Tube.
c. Hold Infusion Tube perpendicular to manubrium
with slight traction on infusion
tube.
d. Insert Remover while continuing to hold Infusion Tube
with slight traction.
e.
Advance Remover. This is a threaded device.
f.
Gentle counterclockwise movement at first may help in seating Remover.
g.
Make sure you
feel the threads seat.
h. Turn it clockwise until remover no longer
turns. This firmly engages Remover into metal (proximal) end of the
infusion tube.
i. Remove infusion tube. Use only the T
shaped knob and pull perpendicular to manubrium.
j. Hold Target Patch during removal. Do not
pull on the Leur fitting or the tube itself.
k. Remove Target
Patch.
l. Dress infusion site using aseptic
technique
m. Dispose of remover and
tube using contaminated sharps procedures.
17.
HOW MUCH AND WHAT TYPE OF FLUID TO GIVE
As stated earlier, giving a fluid bolus to individuals who
are not in shock is not necessarily helpful to the casualty and may be
harmful if it delays treatment of other serious injuries, causes a delay
in the unit’s tactical flow, or causes fluids to not be available to
individuals who truly need fluid resuscitation. The Institute of Medicine
recommended that 7.5% hypertonic saline (HTS) be used for fluid
resuscitation. There were many reasons the institute recommended HTS, but
the main reason was its logistical advantage. It comes in smaller,
lighter, and easier to carry packages than a one liter bag of NS or LR.
The main problem is HTS is not widely available. Therefore, the committee
recommended using a colloid solution such as Hextend until HTS is more
readily available. Hextend is the fluid of choice in a tactical
situation. It is recommended over crystalloid solution because of its
much longer presence in the vascular system after administration,
preventing both extravascular fluid overload and the need for additional
fluid administration in cases of delayed evacuation. For example, if you
give a casualty 500 cc’s of LR or NS, one hour later over 300 cc’s of that
fluid has shifted out of the vascular system and into the surrounding
tissue. However, if you gave 500 cc’s of Hextend, almost all of it will
stay in the circulating system. Therefore, the current recommendation for
casualties in shock during the Tactical Field Care Phase is an initial
infusion of 500 cc’s of Hextend, followed by 30 minutes of observation.
If an unsatisfactory clinical improvement is noted, an additional 500 cc’s
of Hextend is given. No casualty should be given more than 1000 cc’s of
Hextend.
But what
if you do not have a colloid solution like Hextend? You must use the
fluid that you have access to. Regardless of what type of fluid you have,
a technique called “minimal fluid resuscitation” is used. Minimal fluid
resuscitation means instead of administering enough fluid to return the
casualties blood pressure back to normal, you only administer enough fluid
to maintain their blood pressure high enough to preserve life, or high
enough that you can feel a radial pulse. In the absence of a head injury,
a blood pressure high enough to cause a radial pulse should provide the
casualty with normal mentation.
|
CASUALTY
ASSESSMENT AND FLUID RESUSCITATION |
|
Care Under Fire Phase:
No care given in this phase.
Tactical Field Care
Phase: Knowing when it is necessary to start an IV or IO is
critical in the Casualty Assessment process. Using the PO route
when available saves you time by not starting unnecessary IVs on
casualties that do not need it and saves valuable resources for
casualties who do. Using the “minimal fluid resuscitation”
technique also increases the casualty’s chances of survival by not
overloading them with unnecessary fluid. |
REFERENCES
FAST1 Intraosseous Infusion System for adult patients
User’s Manual, Pyng Medical Corp
Pre-Hospital Trauma Life Support, Military Edition, 6th
Edition, Chapter 21
Military Medicine, Volume 172, 11:1, 2007
REV: July 2008
|
IV INSERTION STEPS |
|
1 |
Make decision |
|
2 |
Assemble and check gear:
IV
bag, IV tubing, IV catheter, tourniquet, alcohol/betadine prep pads,
2x2 gauze pads, gloves, tape, bandaid |
|
3 |
Prepare patient |
|
4 |
Select vein:
Work distal to proximal (no
hand sticks allowed. During the partner stick, the antecubital
region will be used for live stick); place tourniquet above the
tricep/bicep; prepare site with alcohol or betadine prep pad; don
gloves
|
|
5 |
Insert IV:
Insert needle bevel up; check for
blood return; advance catheter and remove needle (must maintain
positive catheter control)
|
|
6 |
Connecting tube:
Remove tourniquet; connect tubing to
catheter; open IV line and check for placement
|
|
7 |
Secure IV:
Secure the catheter with tape; regulate IV flow
rate
|
|
|
IV REMOVAL STEPS |
|
1 |
Discontinue IV:
Verbalize when to discontinue IV and change
IV bags, peel back taping, prepare 2x2 gauze pad, with 2x2 in one
hand, over the IV site, remove the catheter with open hand and apply
pressure with 2x2’s to stop bleeding, apply bandaid |
|
FAST1 INSERTION STEPS |
|
1 |
Cleanse insertion site with aseptic technique |
|
2 |
Align finger with
jugular notch and place patch.
Verify patch is midline. |
|
3 |
Place Introducer in
target on patch.
Hold with a firm grasp |
|
4 |
Insert Introducer
perpendicular to the manubrium.
Use continuous increasing pressure to insert. |
|
5 |
Remove Introducer. Pull straight back |
|
6 |
Connect Infusion Tube to Target Patch
Tube. |
|
7 |
Connect to IV tubing. |
|
8 |
Place Dome. |
|
9 |
Attach Remover package to patient for transport. |
|
|
|
|
|
FAST1 REMOVAL STEPS |
|
1 |
Remove Dome while holding patch against the
patient’s skin |
|
2 |
Disconnect Infusion Tube; ensure IV flow is
turned off. |
|
3 |
Insert Remover in Tubing while holding Infusion
Tube perpendicular to patient. |
|
4 |
Advance the Remover, turn it clockwise until the
Remover stops, this engages the thread into the metal (proximal) tip
of the Infusion Tube. |
|
5 |
Remove the Infusion Tube, DO NOT PULL on Leur
or Tubing. Hold Remover using “T-Shaped” knob, pull straight
out (perpendicular to infusion site) while holding the Target Patch
down. |
|
6 |
Remove Target Patch. |
|
7
8 |
Dress Infusion Site using aseptic technique.
Dispose of Remover and Infusion Tube using
contaminated sharps protocol. |
