UNITED STATES MARINE CORPS
Field Medical Training Battalion
Camp Lejeune
FMST 1410
Manage Hemorrhage
TERMINAL
LEARNING OBJECTIVE
1. Given
a casualty with life-threatening hemorrhage in a combat environment and
standard field medical equipment and supplies, manage life-threatening
hemorrhage, to prevent further injury or death. (FMST-HSS-1410)
ENABLING
LEARNING OBJECTIVE
1. Without
the aid of references, given a description or list, identify the types of
hemorrhage, per the student handout. (FMST-HSS-1410a)
2. Without
the aid of references, given a description or list, identify the signs and
symptoms of internal hemorrhage, per the student handout. (FMST-HSS-1410b)
3. Without
the aid of references, given a description or list, estimate the amount of blood
loss, per the student handout. (FMST-HSS-1410c)
4. Without
the aid of references, given a description or list, identify the methods of
hemorrhage control, per the student handout. (FMST-HSS-1410d)
5. Without
the aid of references, given a description or list, identify the principles of
bandaging, per the student handout. (FMST-HSS-1410e)
6. Without
the aid of references, given a description or list, state the purpose of
hemostatic agents, per the student handout. (FMST-HSS-1410f)
7. Without
the aid of references, given a description or list, identify the indications for
use of hemostatic agents, per the student handout. (FMST-HSS-1410g)
8. Without
the aid of references, given a description or list, identify the precautions for
use of hemostatic agents, per the student handout. (FMST-HSS-1410h)
9. Without
the aid of reference materials, given a simulated casualty with life-threatening
hemorrhage and standard field medical equipment and supplies, manage hemorrhage,
per the student handout. (FMST-HSS-1410i)
1. OVERVIEW
Historically, 20% of all injured combatants die on the
battlefield. Of that 20% who die, approximately 65% will die of massive,
multiple trauma, and are probably not salvageable. Based on the data from the
Vietnam conflict, over 60% of battlefield casualties died of exsanguination
(bleeding out) within 3 to 5 minutes and could have been salvaged with timely
intervention. In order to continue to decrease these statistics, you must be
able to rapidly identify and manage internal and external hemorrhage. You must
also recognize the type of bleeding, apply the appropriate hemorrhage control
techniques, understand the varying degrees of risk associated with types of
hemorrhage, and how to estimate blood loss.
2. TYPES
OF HEMORRHAGE
Hemorrhage is defined as
blood escaping from arteries, veins, or capillaries.
Arterial
- if an artery near the surface is damaged, BRIGHT RED BLOOD will gush out in
spurts that are synchronized with the heartbeat.
Venous
- blood from the veins is DARK RED. Venous bleeding is characterized by a
steady, even flow.
Capillary
- capillary blood
is usually BRICK RED in color. If capillaries bleed, the blood oozes out
slowly.
3. EXTERNAL
HEMORRHAGE
Loss of blood from wounds
that damage the large vessels of the extremities are a common source of
massive external hemorrhage in combat. The cause of external hemorrhage can
be varied depending on the setting in which the injury has taken place.
Some of these causes include, but are not limited to, gunshots, stabbings,
shrapnel, vehicle accidents, and blasts. The importance for you lies in the
identification of life threatening hemorrhage versus non-life threatening
hemorrhage. The difference between life threatening and non-life
threatening exists in the amount of blood loss and the class of shock of the
patient.
4.
INTERNAL
HEMORRHAGE
Blood loss into the chest or
abdomen cannot be controlled in the field. Despite aggressive treatment and
fluid resuscitation, casualties with major internal vascular injuries
frequently die in the field. The patient with severe internal hemorrhage
may develop hypovolemic shock before the extent of the blood loss is
realized. Internal hemorrhage requires immediate surgical intervention at a
higher echelon of care. Bleeding, however slight, from any body orifice is
serious, as it usually indicates an internal source of hemorrhage that may
not be readily evident. Signs that may indicate serious internal injury (or
disease) would include bleeding from the mouth, rectum, or blood in the
urine. Nonmenstrual bleeding from the vagina is always significant.
Internal hemorrhage can be caused by the following examples of injuries:
blunt trauma, concussion injuries from blasts, vehicle accidents, falling
from heights, collapsing buildings and closed fractures (bones or bone
fragments lacerate arteries or large veins).
5. Signs
and Symptoms of External and Internal Hemorrhage
External hemorrhage
- Massive blood loss
- Obvious signs and symptoms of
shock (Class III or IV shock)
Internal hemorrhage
- Hematemesis (vomiting bright
red blood)
- Hemoptysis (coughing up bright
red blood)
- Melena (black tarry stools)
- Hematuria (blood in the urine)
- Ecchymosis (bruising)
- Rapidly forming hematoma and
edema
- Rigidity with or without
rebound tenderness upon palpation in the abdomen
- Signs of shock
6.
ESTIMATING
BLOOD LOSS (EBL)
(see figure 1)
Gather a quick estimation of
blood loss based on the following factors:
- Look for blood
surrounding the patient.
- Inspect clothing for
blood saturation.
- Inspect bandage
saturation for associated blood loss. See figure 1 for amount of blood each
dressing will hold when fully saturated.
- Determine level of shock
|
|
Small
Battle Dressing |
Medium
Battle Dressing |
Large
Battle Dressing |
Abdominal Battle Dressing |
|
Amount of estimated
blood |
300 ml |
750 ml |
1000 ml |
2500 ml |
|
*EBL |
About 6% |
About 15% |
About 20% |
About 50% |
|
*Amounts are based on
the average adult blood volume of about 5 liters. |
Figure 1. Estimating Blood
Loss Based On Saturation of Dressings
7.  METHODS
OF HEMORRHAGE CONTROL METHODS
OF HEMORRHAGE CONTROL
Direct
Pressure
Direct pressure, applied
over a bleeding site, is the initial technique used to control external
hemorrhage. Most external hemorrhage is readily controlled by direct
pressure at the bleeding site, even carotid and femoral bleeding! To
perform direct pressure correctly it requires two hands pushing against the
casualty’s wound laying on a flat or hard surface. You must lean into
delivery of direct pressure and never let up on it to check the wound. If
you need to perform other procedures, a pressure dressing can be made using
bandages and ace wraps. If direct pressure fails to control extremity
hemorrhage, the next step is to use a tourniquet. The only time a
tourniquet will be the first step in controlling hemorrhage is in the Care
Under Fire phase.
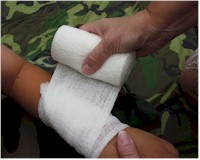
Bandages and Dressings
A bandage is any material used
to hold a dressing in place. It can be applied to wrap or bind a body part or
dressing. The bandage also provides additional pressure to the dressing or
splint and protects and covers the dressing completely.
Things to keep in mind about bandages/dressings
- Ensure the dressing is tight enough.
- Provide pressure over the entire wound.
- Dressings must
cover the entire wound, bandages must cover
entire dressing.
- Leave the fingers and toes exposed
- Assess circulation and neurological status using PMS:
Pulse (check pulses in extremities).
Motor (movement).
Sensation (can the patient feel you touching them?).
- If
hemorrhage continues:
DO NOT remove the first pressure dressing, apply a second one
over the first.
The following provides brief
information regarding the types of bandages and dressings that you may
encounter:
|
Kerlix Gauze |
Kerlix gauze
Advantages:
- Extremely absorbent.
- Weave of material makes roll stretchable.
- Sterile.
- Good for packing cavities.
Disadvantages:
- Looses bulk when wet.
- Catches debris and snags very easily.
|

Ace Wrap
|
Ace wrap
Advantages:
- Can be applied quickly.
- Gives pressure to the entire affected area.
- Provides excellent support for sprains and strains.
Disadvantages:
- Can decrease peripheral circulation.
|
Triangular Bandage
|
Cravats or Triangular Bandages (37”x37”x52”)
Advantages:
- Versatile
- Come in small packages with safety pins.
- Can be used as a tourniquet.
Disadvantages:
- Has very little absorbency.
Combination Dressing/bandage
(see figure 2 & 3)
|
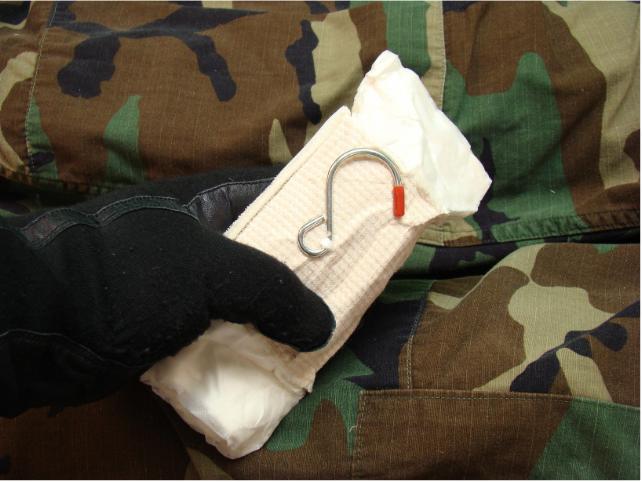
Substitute
Figure 2: Cinch Tight
Sterile Compression Bandage* |
Cinch Tight, Sterile Compression Bandage
(8” x 10”)
These pressure dressings are
four-inch wide elastic wraps with an 8”x10” absorbent cotton pad attached close
to the end of one side of the elastic wrap. On the other side of the absorbent
pad, in the middle on the elastic wrap side, is a steel S-hook that allows for
self-application of the dressing and gives it the ability to apply tightly.
Finally, at both ends of the elastic wrap are Velcro strips that allow for ease
of securing the dressing.
Instructions for use
- Open and remove bandage.
- Unroll the bandage and place
absorbent pad on wound with hook on top.
- Anchor elastic wrap onto
Velcro strip at bandages edge.
- Feed elastic bandage through
hook and pull to secure absorbent pad in place.
- Wrap the elastic bandage
tightly in the direction through which it was pulled.
- Press the Velcro strip at the
very end onto the bandage to secure it.
|
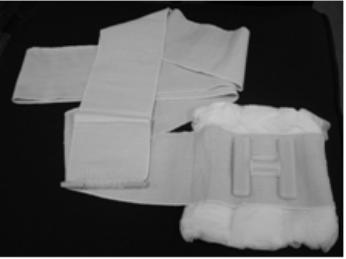
Figure 3: "H" Bandage |
“H” Bandage Combat Dressing
These pressure dressing bandages
are 4” wide elastic wraps with 8” x 10” absorbent cotton pad attached close to
the end of one side of the elastic wrap. On the other side of the absorbent
pad, in the middle on the elastic wrap side is a hard plastic H-anchor that
allows for wrapping the dressing around the anchor to apply pressure directly
over wound. It also gives it the ability for self-application. Pressure
dressings can be applied to extremity, chest, abdominal, and head wounds.
Instructions for use
- Open and remove pressure dressing.
- Place pressure dressing over injury with steady pressure,
isolating Velcro end.
- Pull draped elastic end and secure to Velcro end.
- Feed wrap through lower leg of H anchor, pulling firmly.
- Wind wrap back around injury
site and feed wrap through upper leg of H –anchor, pulling firmly.
- Continue wrapping elastic wrap around injury site, keeping the
wrap tight.
- Firmly attach Velcro end of
wrap and secure with plastic hooks on sides of wrap.
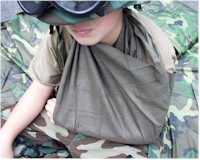
- For fractures of the arm, the
elastic wrap can be used as a sling or swathe.
Expedient (Improvised)
Dressing and Bandages
- Patients clothing.
- Patients equipment.
- Your only limitation is YOUR
imagination!!!!
Tourniquets:
(for more information see
the PHTLS, 6th Ed, pages 501-513).
In civilian trauma care the use
of a tourniquet is reserved for when direct pressure fails, this is not the case
in Care Under Fire. The initial treatment for an extremity hemorrhage in a
tactical setting is a tourniquet. A pressure dressing can be used later in the
care process of a combat casualty.
|
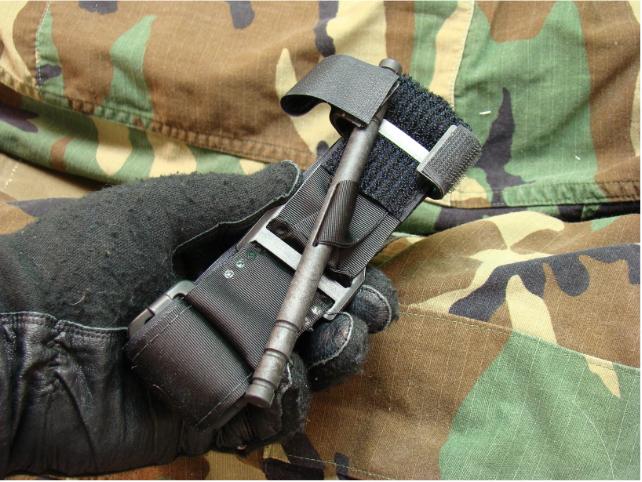
CAT Tourniquet |
The standard “web belt through
the buckle” tourniquet issued by the military during Vietnam was not highly
regarded by the combat medic community. The U.S. Army Institute of Surgical
Research identified the Combat Application Tourniquet (CAT) as the one best
suited for battlefield use. This tourniquet can be rapidly applied with one
hand to one’s own or another’s extremities. This tourniquet is issued
throughout all U.S. combatant forces. If the CAT tourniquet is not available
the provider should be able to make a “field expedient” tourniquet. The use of
the tourniquet in a combat setting is not limited to solely the CAT, there may
be other brands of tourniquets. While it may have a different name, the
principles of use are similar. The goal is to stop arterial bleeding in an
extremity to prevent loss of life.
Characteristics of the CAT
- Tourniquet
of choice
- Lightweight
- Easy to apply and
use
Field Expedient Tourniquet
- If CAT is unavailable, choose
a material about two inches (2”) wide.
- Material such as rope, wire,
and string should NOT be used because they can cut into flesh.
- Tie a strong windlass (stick)
to a cravat or other strong material.

-
Slide one
or two rings on each side of the cravat.
- Tie the cravat around the
affected limb, two to four inches above the wound, loosely. (This will allow
the windlass to turn, creating circumferential pressure to stop the bleed.)
- Twist the windlass until the
hemorrhage is controlled.
- Slide the ring to the windlass
and secure windlass to the ring(s).
Tourniquet Application
Application site
- a tourniquet should be applied just above the hemorrhaging wound. Do
not place a tourniquet below the knee or elbow or over a joint. If you place a
tourniquet below the knee or elbow, there are two bones, i.e., Tibia/Fibula
below the knee and Radius/Ulna below the elbow, which can splint the
hemorrhaging vessel and make it impossible to control the bleed.
Application tightness
- apply tourniquet tight enough to block arterial flow. Generally, the bigger
the limb, the tighter the tourniquet. So a leg will require more pressure to
control bleeding than an arm will.
Other considerations
- a tourniquet will be painful for the conscious casualty to tolerate but don’t
stop tightening until the hemorrhage is controlled. Pain management should be
considered, provided that the casualty does not have signs of Class III or IV
shock. You must document placement of a tourniquet by placing a “T” and the
time of application on the casualty’s forehead. After application, do not cover
a tourniquet under any condition, leave it exposed for easy monitoring for
continued hemorrhage.
Converting A Tourniquet To A
Dressing
 Whenever
a tourniquet has been required, consider transitioning to another mode of
hemorrhage control during the Tactical Field Care phase. In order to
properly convert a tourniquet, you must: Whenever
a tourniquet has been required, consider transitioning to another mode of
hemorrhage control during the Tactical Field Care phase. In order to
properly convert a tourniquet, you must:
- Apply pressure dressing.
- Leave tourniquet in place and slowly loosen.
- Monitor for bleeding from underneath the dressings.
- If bleeding is not controlled,
retighten tourniquet and remove pressure dressing.
- Apply HemCon, per the instructions.
- Apply pressure dressing over HemCon.
- Leave tourniquet in place and slowly loosen.
- Monitor for bleeding from underneath the dressings.
- If bleeding is not controlled, retighten tourniquet and remove
dressings.
- Apply QuikClot, per the instructions.
- Leave tourniquet in place and slowly loosen.
- Monitor for bleeding from underneath the dressings.
- If bleeding is not
controlled, retighten tourniquet and expedite CASEVAC.
Converting a tourniquet back to a dressing should NOT be
attempted when:
- The casualty is in Class III or IV shock
- There has been a complete amputation
- There is no one to observe casualty for rebleeding
- Tourniquet in place for more than 6 hours
8. HEMOSTATIC
AGENTS (QuikClot
and HemCon)
These products will cause
the wound to develop a clot that will stop the flow of blood and will remain
within the wound until removed by medical personnel. They are applied to
wounds with moderate to severe bleeding (venous or arterial). Both
hemostatic agents have unique properties and both have strengths and
liabilities and carry with them the requirement for specific training for
all members of the combat team. There is no singular, best method to
control hemorrhage. Each situation is different. Factors such as the
amount of blood lost, proximity to surgical care, number of other casualties
and resources available (medical and transport) will affect the decision.
QuikClot: A mineral that
is highly effective in controlling hemorrhaging. It is granular, packaged in an
individual airtight package, and can be poured into a wound after pooled blood
has been removed. It looks and feels like coarse sand. This product is
effective in stopping bleeding, but it can have undesirable side effects because
of the heat generated when it gets wet. The heat is caused by the exothermic
reaction that occurs when QuikClot absorbs water from the wound, thereby
concentrating the clotting factors in the blood. This heat generated can be
enough to cause burns. This product has been used safely in the civilian trauma
setting and by the military during Operation Iraqi Freedom. Although the data
regarding QuikClot is not plentiful or standardized, to date the reports have
shown that lives were saved when it was used properly.
- In the presence of normal
(undiluted) blood, this adsorption causes only a slight body temperature
increase (approximately 109-114° F. If blood is extremely diluted, exothermic
reaction can be more extreme.
- In the presence of liquids
like WATER, more extreme heat can be generated by this adsorption. This
reaction lasts approximately 4-5 seconds and then ENDS. Once granules have
adsorbed all the liquid possible, they go INERT.
- Exothermia (production of
heat) is controlled by adjusting the balance between volume of water and volume
of product.
- Flooding the granules with
water can instantly stop the exothermic reaction and adsorption.
Application Procedures
(for
more information see the PHTLS, 6th Ed. pages 533-534 or visit the
LRC on the Command Quarterdeck to watch a video of it being used on a pig)
- Apply direct, firm pressure to
wound.
- If bleeding is stopped or
nearly stopped after one minute of pressure, wrap and tie bandage to maintain
pressure on wound and CASEVAC, as no further immediate treatment is needed.
- If moderate to severe bleeding
continues after 90 seconds, hold QuikClot away from face and tear open at tabs.
- Remove previously applied
bandages, making certain to wipe away as much excess blood and liquid as
possible.
- Pour (DO NOT DUMP) QuikClot in
a back-and-forth motion onto the source of bleeding. QuikClot changes from its
dry light beige color to a dark color as it adsorbs moisture and begins to clot.
- Stop pouring promptly when you
see a dry layer of QuikClot on wound indicating that there is no more blood to
adsorb.
- Immediately bandage wound and
apply firm direct pressure.
- CASEVAC patient as soon as
possible to a medical facility.
- Be certain QuikClot package
accompanies patient so receiving medical staff can follow directions to remove
QuikClot properly.
 Precautions Precautions
-
Spurting blood - The
caregiver should be aware that continuously spurting blood from a small diameter
puncture wound could create a high-pressure exit path. The source of such
bleeding may be too far away from the entry point for QuikClot to be effective.
- Slow the bleed with a
tourniquet for extremity hemorrhage or pressure points for non-extremity
hemorrhage, and then apply QuikClot in conjunction with a pressure dressing.
SLOWLY release the tourniquet or pressure point. Reassess effectiveness.
- Do not ingest or inhale
QuikClot.
- If ingested, drink several
glasses of water and seek medical attention.
- Keep away from the face when
opening or pouring.
- If inhaled, move to open air
or a well-ventilated space.
- Do not use bare hands to apply
pressure immediately following application of QuikClot.
- If adsorbing granules cause
heat discomfort to skin, promptly brush away and/or flood with water.
- Sterility not guaranteed if
package is damaged or opened. Safely discard damaged open packages.
- Keep away from children
NOTE: If you cannot see where
the hemorrhage is coming from, DO NOT USE QuikClot. It must be poured on the
hemorrhaging vessel to be effective.
HemCon
- This product is made
from shrimp shells but does NOT cause reactions in persons allergic to
shellfish or iodine. The Chitosan (Kahy-tuh-san) side of the
dressing promotes hemostasis by forming a strong durable clot to moderate
and severe external hemorrhage. It also seals the injury site to further
bleeding and external infectious agents.
Application Procedures (see figure 9 or for more information see PHTLS,
6th Ed. pages 511- 513) 513)
- Open the bandage, grasping
the opposing edges of the foil pouch and pull apart.
- Ensure that the non-stick side
is up. HemCon bandages have two sides: a cream-colored active side, which goes
on the wound, and a darker non-stick side which is labeled “THIS SIDE UP”.
The bandage will not work upside down.
- Apply directly on source of
bleeding.
It is critical to place the
bandage on the source of the bleeding, the area where the blood vessel damage
has actually occurred. For smaller wounds, the bandage can be cut to smaller
pieces. For larger wounds, multiple bandages can be used.
- Apply firm, even pressure
to the side labeled “THIS SIDE UP.” Backing the banage with a gauze roll
helps ensure uniform
pressure and increases performance. Maintain pressure on the bandage for
at least two minutes or until bleeding is controlled.
If bandage is not effective after four minutes, remove original
and apply a new bandage. Additional bandages may NOT be applied over
ineffective bandages. HemCon should be covered with a pressure dressing once
shown to be effective. The bandage can remain in place for up to 48 hours and
should be removed with water or saline.
NOTE: Once
applied and in contact with blood or other fluids, you have less than 30
seconds to adjust or reposition the bandage. Apply a new bandage to other
exposed bleeding sites.
9. COMPONENTS
OF THE INDIVIDUAL FIRST AID KIT (IFAK)
The IFAK is designed to be more
compact and have greater life saving capability than its predecessors. The IFAK
is issued to every Marine and Sailor. Your Corpsmen Assault Pack will have more
medical gear than the IFAK but this section is designed to introduce its
contents and characteristics so you may better educate Marine Corps personnel.
Bleeding to death is the leading
cause of preventable death on the battlefield. As such, each Marine's IFAK
contains many of the items discussed in this chapter. It is essential that all
Marines are properly trained in their use. Training is one of the many
responsibilities of the FMST.
Contents
- Adhesive Bandages (10)
- Packet of Absorbent Hemostatic
Agent (QuikClot) (1)
- Bulky Gauze Rolls (2) - These
are used for the protection of minor wounds. They can also be wrapped loosely
around the burn dressing to secure it over the burn area. They are also used
for direct pressure of medium and severe wounds and to wipe away excess blood
prior to the application of the hemostatic agent.
- Package of Burn Dressing
(Water-Jel) (1)
- Bottle of Iodine Water
Purification Tablets (1)
- Bottle of Wound Disinfectant
(Betadine Solution) (1)
- Tourniquet (1)
- Pressure Dressings (2) -
either Cinch Tight or H- bandage

|
CASUALTY
ASSESSMENT AND HEMORRHAGE CONTROL |
|
Care Under Fire Phase:
Hemorrhage control is the only
intervention performed during this phase! You must be able to recognize
“life-threatening” hemorrhage. For extremity hemorrhage, use a
tourniquet. For non-extremity hemorrhage, use direct pressure with a
hemostatic dressing like HemCon or QuikClot.
Tactical Field Care Phase:
During this phase, reassess your
treatment performed during Care Under Fire Phase to control the
hemorrhage. Assess the airway and intervene if necessary. Complete a
head to toe assessment using DCAP-BTLS (deformities, contusions,
abrasions, punctures, burns, tenderness, lacerations, and swelling) noting
and treating additional injuries. Determine if vascular access is
required (see Combat Fluid Resuscitation lesson) and give fluids if
necessary. If the casualty is able to drink fluids, they should be
encouraged to do so. Consider pain medications and give antibiotics if
warranted. Reassess all care provided. Document care given, prevent
hypothermia, and CASEVAC. |
REFERENCE
Pre-Hospital Trauma
Life Support, Military Edition, 6th Ed, Chapter 7
REV: July 2008
Hemorrhage Review
1. List four signs
or symptoms of internal hemorrhage.
2. Identify
the appropriate treatment for life threatening hemorrhage during “Care Under
Fire”.
3. List
four instances in which you SHOULD NOT convert a tourniquet to a
pressure dressing.
4. Describe the correct
procedure for applying QuikClot to a wound with spurting blood. |

