NAVEDTRA 13119 Standard First Aid Course - Chapter 11 - Rescue and Transportation
Rescue and Transportation
Department of the Navy
Bureau of Medicine and Surgery
If you are faced with the problem of rescuing a person threatened by fire, explosive or poisonous gases, or some other emergency, do not take action until you have had time to determine the extent of the danger and your ability to cope with it. In a large number of accidents the rescuer rushes in and becomes the second casualty. Do not take unnecessary chances! Do not attempt any rescue that needlessly endangers your own life!
Protective Equipment
The Navy uses a wide variety of special protective equipment. It includes the oxygen breathing apparatus; air-line masks; emergency escape breathing devices; protective (gas) masks; proximity suit; tending lines; and detection devices.
Figure 11-1 - A-4 Oxygen Breathing Apparatus.
Oxygen Breathing Apparatus
The type A-4 Oxygen Breathing Apparatus (OBA) is a self-contained breathing apparatus (Fig. 11-1) used throughout the Navy. It is particularly valuable for rescue purposes because it enables the wearer to breathe independently of the outside atmosphere. It produces its own oxygen and allows the wearer to enter compartments, voids, or tanks that have a low oxygen content or that contain smoke, dust, or fire. The face-piece contains the eyepiece, the speaking diaphragm, and the head straps. The breathing bag contains the oxygen that is generated by the canister. One breathing tube transports the oxygen from the breathing bag to the face-piece; the other transports the exhaled air back to the canister. Both tubes are made of corrugated rubber. They control the flow and help cool the air. The timer is located so that you can check the amount of time remaining. To set the timer, turn the knob clockwise to 60 minutes, and then turn it counterclockwise to 30 minutes. By setting the timer to 60 first, you fully wind the alarm bell spring. When 30 minutes have expired, the warning bell will sound continuously for 10 or more seconds. All OBA equipment and canisters must be stored in a cool, dry place. The life of an OBA will be lengthened if it is stored under these conditions.
Figure 11-2 - Air-line Hose Mask Components.
Air-line Masks
The air-line mask (Fig. 11-2) is part of all ship's repair party locker allowance. Never use the air-line mask to fight fires. It may be used to enter smoke-filled spaces to rescue personnel. The air-line mask is a demand-flow, air-line respirator with a speaking diaphragm, monocular lens with adjustable head harness, breathing tube, and belt-mounted demand regulator with male and female (buddy) quick-disconnect fittings. A 25-foot length of hose with male and female quick-disconnect fittings is provided for use with the air-line mask. This hose can be used to connect to the demand regulator fitting and a low-pressure air supply, or to a compressed air cylinder with an intervening air regulator and air filter. The maximum length of hose that may be used with the air-line mask is 250 feet.
Tending Lines
Tending lines (Fig. 11-3) are used as a precautionary measure to help rescue an individual who is wearing an oxygen breathing apparatus, air-line mask, or similar equipment. A 50-foot nylon covered, steel wire tending line is used aboard ship. The tending line has a stout hook on each end that is closed with a snap catch. The line is pliable and can slide freely around obstructions.
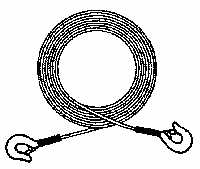
Figure 11-3 - Tending Lines.
If necessary, the rescue should be accomplished by having another person equipped with a breathing apparatus follow the tending line to the person to be rescued. Do not drag the casualty out by the tending line. If the rescue is to take place promptly, someone must be equipped with an OBA that is ready for immediate use and must be standing by ready for immediate entry. The tender should wear rubber gloves and shoes when handling steel tending lines and cables. The OBA wearer and the line tender should both know and use the following system of line signals.
The OATH code is as follows:
| Code O A T H |
Pull 1 pull 2 pulls 3 pulls 4 pulls |
Meaning OK Advance Take Up Slack Help |
Atmosphere Testing Devices
All closed or poorly ventilated compartments, particularly those in which a fire has just occurred, are potentially dangerous. The atmosphere may lack oxygen, contain poisonous gases, or present fire and explosion hazards.
Aboard naval ships, no person may enter any closed compartment or poorly ventilated space unless the ship's gas-free engineer, or his or her authorized representative, has tested the space and declared that it is safe to enter.
Rescue Procedures
If you are faced with the problem of rescuing an individual threatened by fire, explosive or poisonous gases, or some other emergency, do not take any action until you have had time to determine the extent of the danger and your ability to cope with it. In a large number of cases, the rescuer rushes in and becomes the second casualty.
Do not take any unnecessary chances! Do not attempt any rescue that needlessly endangers your own life!
Phases of Rescue Operations
When there are multiple casualties (explosions or ship collisions), rescue operations should be performed in phases. These phases apply only to extrication operations. The first phase is to remove lightly pinned casualties, such as those who can be freed by lifting boxes or removing a small amount of debris. In the second phase, remove those casualties who are trapped in more difficult circumstances but who can be rescued by the use of the equipment at hand and in a minimum amount of time. In the third phase, remove casualties where extrication is extremely difficult and time consuming. This type may possibly involve cutting through decks, or removing large amounts of debris. An example would be rescuing a worker from beneath a large, heavy piece of machinery. The last phase is the removal of the dead.
Stages of Extrication
The first stage of extrication within the rescue phases outlined above is gaining access to the casualty. Much will depend on the location of the accident, damage at the accident site, and the position of the casualty.
The second stage involves giving lifesaving (emergency care) first aid.
The third stage is disentanglement. The careful removal of debris from the casualty.
The fourth stage is preparing the casualty for removal.
The final stage is removing the casualty from the trapped area and transporting to an ambulance or medical facility.
Rescue from Fire
If you must go to the aid of a casualty whose clothing is on fire, try to smother the flames by wrapping the casualty in a coat, or blanket. Leave the head uncovered. Beat out the flames around the head and shoulders, then work downward toward the feet. If you have no material with which to smother the fire, roll the casualty over slowly and beat out the flames with your hands. If the casualty sits or stands, they may be killed instantly by inhaling flames or hot air. Inhaling flames or hot air can kill you! Do not place your face directly over the flames. Turn your face away from the flames when you inhale!
Always use an oxygen breathing apparatus or other protective breathing equipment when you enter a burning compartment.
Rescue from Steam-filled Spaces
It is sometimes possible to rescue a casualty from a space in which there is a steam line. Since steam rises, escape upward may not be possible. If the normal exit is blocked by escaping steam, move the casualty to the escape trunk, or to the lowest level in the compartment. Equipment that offers protection against fire does not protect against steam!
Rescue from Electrical Contact
Rescuing a casualty who has received an electrical shock can be difficult and dangerous.You must not touch the casualty's body, the wire, or any object that may be conducting electricity!
Look for the switch and turn the power off immediately. Do not waste time hunting for the switch, every second is important. If you cannot find the switch, try to remove the wire from the casualty or the casualty from the wire. Use a dry broom handle, branch, pole, oar, board, or similar non-conducting object. An old favorite is to remove the casualty from an electrical contact using the uniform belt. Be careful, the belt was made of cotton, but is now made of nylon and other conductive material. When you are trying to break an electrical contact, always stand on some non-conducting material. The old drop kick method is extremely dangerous and not recommended.
Rescue from Unventilated Compartments
Rescuing a casualty from a void, double bottom, gasoline or oil tank, or any closed compartment or unventilated space is a hazardous procedure. Aboard naval vessels and at naval shore activities, no person is permitted to enter any such space or compartment until a gas-free engineer, or his or her authorized representative, has tested the space and declared it safe to enter.
Rescue from Water
Never attempt to swim to the casualty unless you have been trained in water rescue techniques, and then only if there is no safer way of reaching the casualty. If you do not have the skills, or if the conditions do not warrant rescue by swimming, you should note the exact location (time and any landmarks), and seek help immediately. Many double drownings occur when individuals untrained in water rescue techniques attempt swimming rescues!
The casualty may panic and fight you so violently that you will be unable either to rescue the casualty or to save yourself. Even if you are not trained in water rescue techniques, you can rescue the casualty by holding out a pole, oar, or branch for the casualty to grab hold of, throwing a lifeline, or a buoyant object such as a life preserver. Various methods are used aboard ship to pick up survivors in the water. The method used will depend upon the weather conditions, the type of equipment available aboard the rescue vessel, the number of personnel available for the rescue operation, and the physical condition of the casualty. Most rescue operations aboard ship use motor whaleboats (life boats) or helicopters.
Transportation
In an emergency, there are many ways to move a casualty to safety, ranging from one-person carries to stretchers. The casualty's condition and the immediacy of danger will dictate the appropriate method, but remember to give all necessary first aid before moving the casualty. At times it will be necessary to move the casualty immediately, without regard to the severity of the injuries. Remember, when you move a casualty, you are taking a calculated risk. You may cause further injury or even death!
You are justified in taking such a risk only when it is evident that the casualty will die if not moved.
General Rules
1. Whenever possible, render first aid before transporting the casualty. Reduce the casualty's pain and make them as comfortable as possible.
2. Use a regular stretcher, with enough people to carry it, so that you will not drop the casualty.
3. Whenever possible, take the stretcher to the casualty, instead of carrying the casualty to the stretcher.
4. Fasten the casualty to the stretcher so that they don't slip, slide, or fall off.
5. Use blankets, clothing, or other material to pad the stretcher and protect the casualty from exposure.
6. Casualties should be lying on their back while being moved. However, in some case, the type or location of the injury will necessitate the use of another position. In all cases, it is important to place the casualty in a position that will best protect them from further injury.
7. Always move the casualty feet first so the rear bearer can watch for signs of difficulty breathing.
8. Always give a complete account of the situation before giving the casualty to other personnel. Include what caused the injury and what first aid procedures have been completed. Also, get the name of the casualty and the person whom you are turning them over to. This is one way of protecting yourself and at the same time ensuring that the patient will be in good hands.
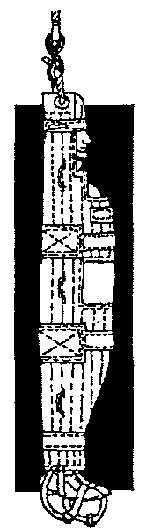
Figure 11-4 - Neil Robertson Stretcher.
The Neil Robertson stretcher (Fig. 11-4) is specially designed to remove a casualty from engineering spaces, holds, vertical trunks, and other compartments where hatches or ladders are too small to use other stretchers. It is made of semi-rigid canvas with wooden slats sewn the length of the stretcher. When firmly wrapped around the casualty in a mummy fashion, it provides sufficient support for the casualty to be lifted vertically. A 12-foot length of handling line is spliced on the O-ring at each end to prevent the casualty from swaying against bulkheads while being lifted. Figures 11-5 through 11-10 provide instructions on its proper application. Secure the outer chest straps over the victim's chest and under his arms. Secure the arms to the side by placing the middle chest strap over the upper arms and chest.
Figure 11-5 - Neil Robertson Stretcher. Arrange the stretcher as depicted.
Figure 11-6 - Neil Robertson Stretcher. Remove the hood.
Figure 11-7 - Neil-Robertson Stretcher. Place the hood on the victim. This is easier than trying to place the victim in the hood while it is still attached to the stretcher.
Figure 11-8 - Neil-Robertson Stretcher. Three persons should pick up the victim as depicted. A fourth person should be available to slide the stretcher under the victim. In placing the victim in the stretcher, ensure that the shoulders line up with the arm holes and chest flaps.
Figure 11-9 - Neil-Robertson Stretcher. Place the victim on the stretcher. If the victim is a short person, make sure that his or her armpits are even with the cut-out section of the flap. This will place the casualty in the correct position in the stretcher and prevent them from slipping out. Secure the hood to the stretcher. Place the chest flaps over the patient's chest and under the arms.
Figure 11-10 - Neil Robertson Stretcher. Fold the leg flaps in place over the victim's legs. If the victim is positioned correctly the hands will be under the leg flap and against the thigh. Secure the leg straps.
The Miller Board is constructed of an outer plastic shell with an injected foam core of polyurethane foam. It is impervious to chemicals and the elements and can be used in virtually every confined space rescue and vertical extrication. The casualty can be turned vertically and laterally with no movement, and the board's narrow design allows passage through hatches and crowded passageways. It fits within a Stokes (basket) stretcher and will float a 250-pound person. The Miller Board will eventually replace the Neil Robertson Stretcher.

Figure 11-11 - Stokes Stretcher
The most commonly used stretcher for transporting the sick and injured is called the (Fig. 11-11) Stokes (basket) stretcher. It is essentially a wire basket supported by iron rods. A new version is made of molded plastic. It is adaptable to a variety of uses, since the casualty can be held securely in place even if the stretcher is tipped or turned. It can be used with floatation devices to rescue casualties from the water. The Stokes should be padded with three blankets: two should be placed lengthwise, so that one will be under each of the casualty's legs, and the third should be folded in half and placed in the upper part to protect the head and shoulders. The casualty should be lowered gently into the stretcher and made as comfortable as possible. Cover the casualty with one or more blankets. Fasten the casualty and blanket with the straps provided over the chest, hips, thigh, and lower legs.
Do not place the straps over the knees or areas of suspected broken bones!
The Army litter (Fig. 11-12) is collapsible, made of canvas, and supported by wooden or aluminum poles. They are used aboard ship only for mass casualty situations and are not to be used for transporting casualties throughout the ship.
Figure 11-12 - Army Litter
Improvised Stretchers
Standard stretchers should be used whenever possible to transport casualties. If none are available, it may be necessary for you to improvise. Sometimes a blanket may be used as a stretcher. The casualty is placed in the middle of the blanket on his or her back. Four people kneel (Fig. 11-13) on each side and roll the edges of the blanket toward the casualty. Stretchers may also be improvised (Fig. 11-14) by using two long poles (approx. 7 feet long) and a blanket. Most improvised stretchers do not give sufficient support in cases where there are fractures or extensive wounds of the body!
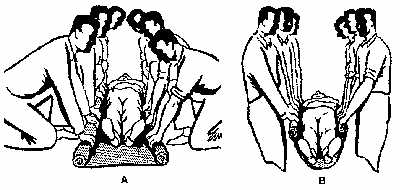
Figure 11-13 - Blanket used as improvised transport stretcher.
Figure 11-14 - Stretcher made from poles and a blanket.
The Fireman's Carry (Fig. 11-15) is one of the easiest ways to carry an unconscious casualty.
1 .Place the casualty face down. Face the casualty, and kneel on one knee at the casualty's head. Pass your hands under the armpits; then slide your hands down the sides and grasp them across the back.
2. Raise the casualty to his knees. Take a better hold across the casualty's back.
3. Raise the casualty to a standing position and place your right leg between the casualty's legs. Grasp the right wrist in your left hand and swing the arm around the back of your neck and down your left shoulder.
4. Stoop quickly and pull the casualty across your shoulders and, at the same time, put your right arm between the casualty's legs.
5. Grasp the casualty's right wrist with your right hand and straighten up. The procedure for lowering the casualty to the deck is also illustrated. Do not attempt if the casualty has an injured arm, leg, ribs, neck, or back!

Figure 11-15 - Fireman's Carry
Figure 11-16 - Tied Hands Crawl
The tied-hands crawl (Fig. 11-16), may be used to drag an unconscious casualty for a short distance. It is particularly useful when you must crawl underneath a low structure, but it is the least desirable because the casualty's head is not supported.
1. Place the casualty face up. Cross the casualty's wrists and tie them together.
2. Kneel astride the casualty and lift the arms over your head so that the casualty's wrists are at the back of your neck.
3. When you crawl forward, raise your shoulders high enough so that the casualty's head will not bump against the deck.
The blanket drag (Fig. 11-17), can be used to move a casualty who, due to the seriousness of the injury, should not be lifted or carried by one person alone.
1. Place the casualty face up on a blanket, and pull the blanket along the deck.
2. Always pull the casualty head first, with the head and shoulders slightly raised, so that the head will not bump against the deck.
Figure 11-17 - Blanket Drag
The pack-strap carry (Fig. 11-18), can be used to move a heavy casualty for some distance.
1. Place the casualty face up.
2. Lie down on your side along the casualty's uninjured or less injured side. Your shoulder should be next to the casualty's armpit.
3. Pull the casualty's far leg over your own, holding it there if necessary.
4. Grasp the casualty's far arm at the wrist and bring it over your upper shoulder as you roll and pull the casualty onto your back.
5. Rise up on your knees, using your free arm for balance and support. Hold both of the casualty's wrists close against your chest with your other hand.
6. Lean forward as you rise to your feet, and keep both of your shoulders under the casualty's armpits.
Do not attempt if the casualty has an injured arm, ribs, neck, or back!
Figure 11-18 - Pack-Strap Carry
The chair carry (Fig. 11-19), can be used to move a casualty away from a position of danger. The casualty is seated on a chair and the chair is carried by two people. This is a good method to use when you must carry a casualty up or down steps or through narrow, winding passageways.
Do not attempt if the casualty has an injured neck, back, or pelvis!
Figure 11-19 - Chair Carry
Figure 11-20 - One-Person Arm Carry
There are several kinds of arm carries that can be used in emergency situations to move a casualty to safety. The one-person arm carry (Fig. 11-20), should not be used to carry a casualty who is seriously injured. Unless the casualty is considerably smaller than you, you will not be able to carry the casualty very far. The two-person carry (Fig. 11-21), unless absolutely necessary, should not be used to carry a casualty who is seriously injured. An alternate two-person carry (Fig. 11-22) also can be used.
1. Two rescuers kneel beside the casualty at the level of the hips, and carefully raise them to a sitting position.
2. Each rescuer puts one arm under the casualty's thighs; hands are clasped and arms are braced.
3. Both rescuers rise slowly to a standing position.
Do not attempt if the casualty is seriously injured!
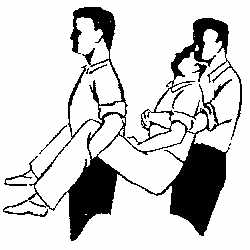
Figure 11-21 - Two-Person Carry by Arms and Legs
Figure 11-22 - Two-Person Arm Carry
References
1. NAVEDTRA 10669-C, Hospital Corpsman 3 & 2
2. NAVEDTRA 10572, Damage Controlman 3 & 2